How to use Audacity: a beginner’s guide to Audacity 4
Audacity is a free, open-source audio recorder and editor for Windows, macOS and Linux. You record or import sound, cut and arrange it on tracks, add effects, and export a WAV or MP3. It is not a full digital audio workstation (DAW), because it has no MIDI editing and no virtual instruments, and for recording, cleaning up and editing real audio that is rarely a loss. Audacity 4 is the current version, with a redesigned window, clips you drag by their edges and effects that run live while you play.
This guide takes you from the download to an exported file in one sitting. It covers getting Audacity 4 through MuseHub, the first launch, the window, a first sound on the timeline, a first recording, the first cuts, a first effect, cleanup, and the difference between saving and exporting. Each step is short and ends with a link to the guide that goes deeper. A box for readers who know Audacity 3 and a table of ten shortcuts close it out.
Tested on Audacity 4.0.0 on macOS; the screenshots are from that install. Windows differs only in the system dialogs.
Audacity and free plugins to start with


What Audacity is, and what it is not
Audacity is an audio editor and recorder. Its own FAQ says it is “blurring the line between audio editor and DAW”. It has non-destructive editing and realtime effects, while “lacking some key features which DAWs traditionally have (MIDI editing and virtual instruments)”. So if the job is a podcast episode, a voice-over, a digitized record, a rehearsal recording or a vocal take over a backing track, Audacity does all of it. If the job is writing a song from software instruments and MIDI, you want a DAW, and what a DAW is explains the difference. The best free audio editing software compares Audacity with the alternatives.
Three facts from the Audacity FAQ settle the questions beginners ask first. Audacity “has always — and will always — remain free for everyone”. It is open source under the GNU General Public License, so anyone can read the code. And it is not spyware; the only data it collects is for error reports and update checks, and the first launch lets you switch both off.
What you need
- A computer running Windows 10 or 11, macOS 12 or later, or a current Linux distribution. The FAQ lists these as tested; older versions are “believed to work”.
- Something to record with. The built-in microphone on a laptop is fine for the first take. A USB microphone plugs straight in; an XLR microphone needs an audio interface between it and the computer.
- Headphones. The manual calls them “more important than the microphone”, because speakers feed your recording back into the microphone.
- Twenty minutes. The steps below fit in one sitting.
Step 1: Get Audacity 4 through MuseHub
MuseHub is the official distributor of Audacity. Downloading through it also gives you free extras for your projects: the MuseFX effect plugins, free loops and sound effects that drop straight into Audacity, and the MuseSounds instrument libraries if you also write music in MuseScore Studio. MuseHub keeps Audacity and the plugins updated, and it is where the Get effects button inside Audacity leads. Audacity is also downloadable from audacityteam.org; the program is the same either way.
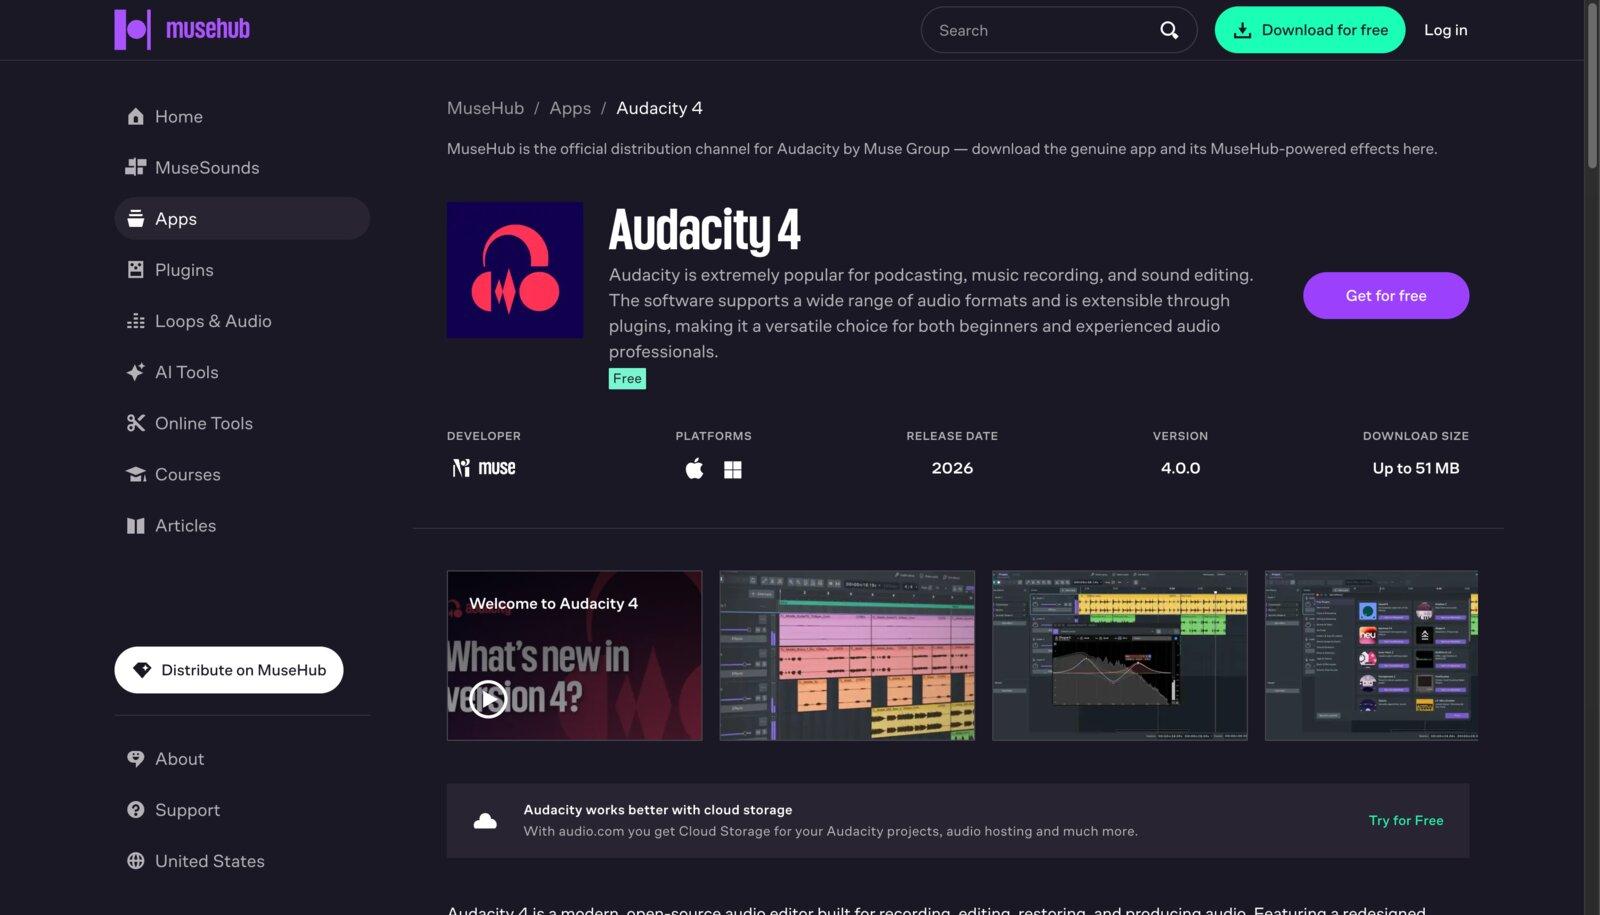
Open the Audacity page on musehub.com and click Get for free. It downloads the MuseHub app for Windows or macOS. Run the installer and open MuseHub. The welcome screen asks you to create a free account or sign in, and on a Mac it asks for permission to install content; click Enable and choose Allow in the macOS prompt. The account is recommended, because the free plugins and packs install against it, but Audacity itself installs without one.
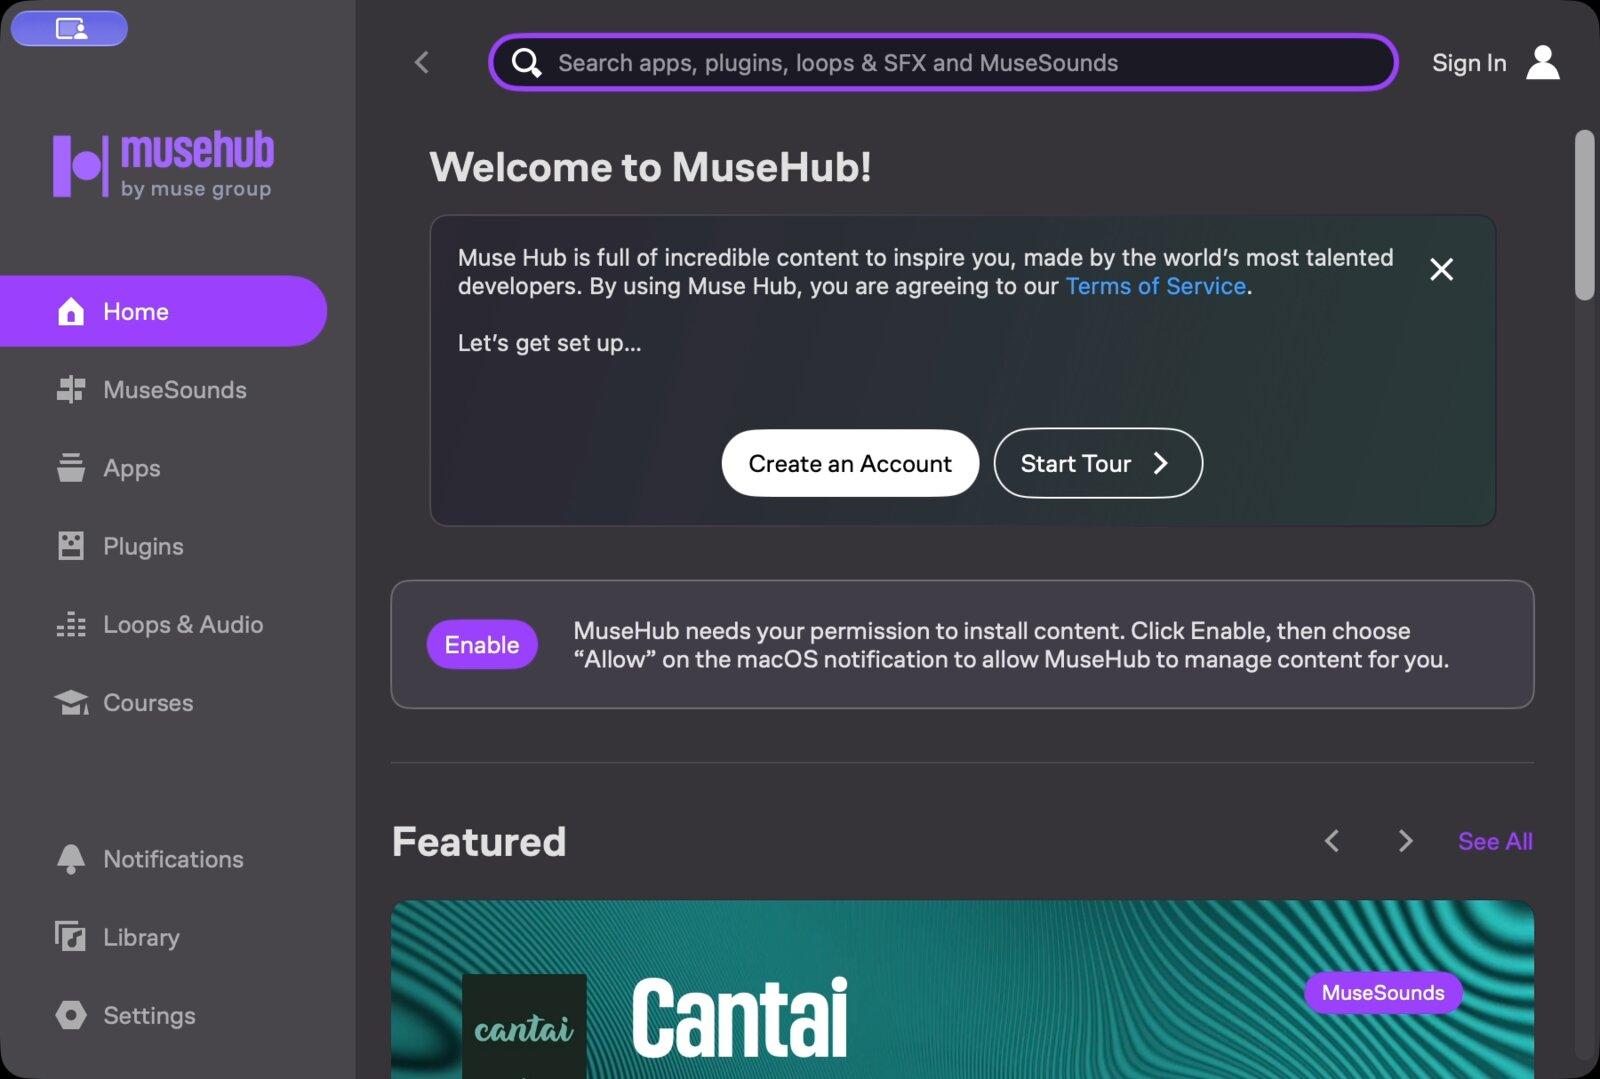
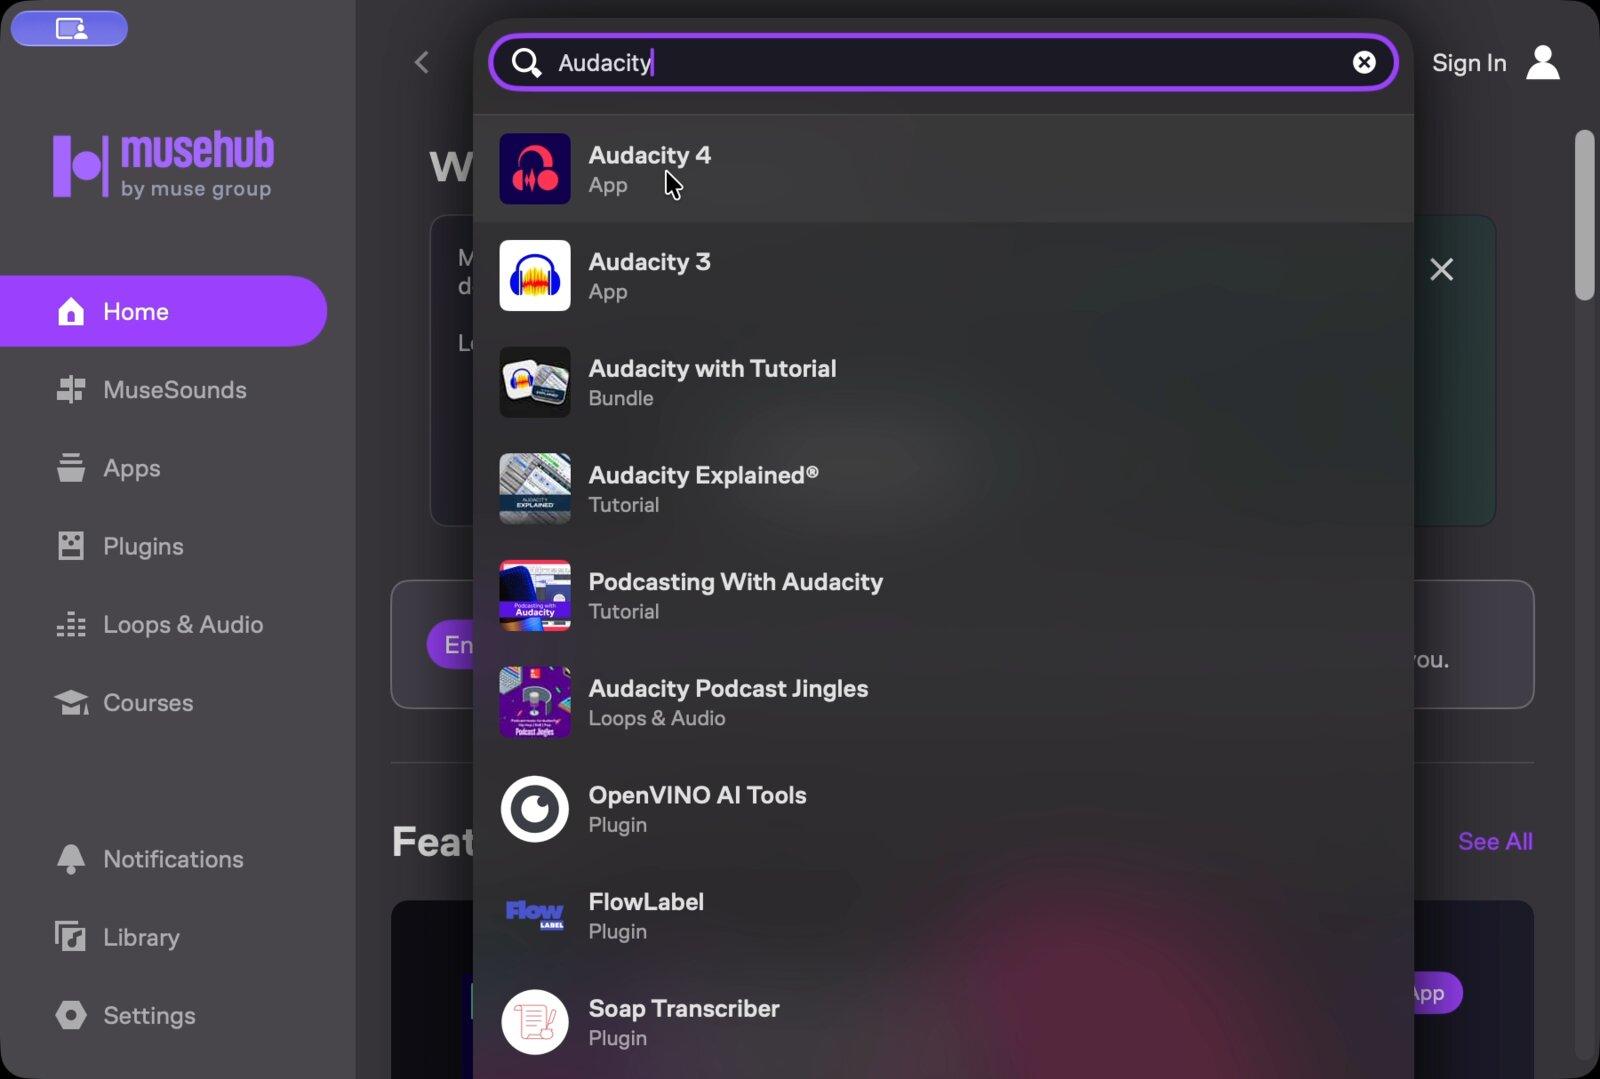
Search for Audacity. Type it in the search bar at the top. The list shows Audacity 4, Audacity 3 (still available for the tools that have not moved yet, such as the OpenVINO AI effects), the Audacity courses, and the OpenVINO plugin. Choose Audacity 4 and click Get. MuseHub downloads it, installs it and can open it for you.
If you already have Audacity 3, install Audacity 4 alongside it. Audacity 4 opens your .aup3 projects and saves them in its own format. What else MuseHub offers, and how it fits with Audacity and MuseScore Studio, is in what MuseHub is.

Step 2: The first launch
Audacity 4 asks a few questions on the first launch, then opens on a home screen rather than an empty project. Both are new, and both are worth a minute.
The setup pages. The first launch is a five-page Getting started wizard. Nothing here is permanent; every choice can be changed later in Preferences.
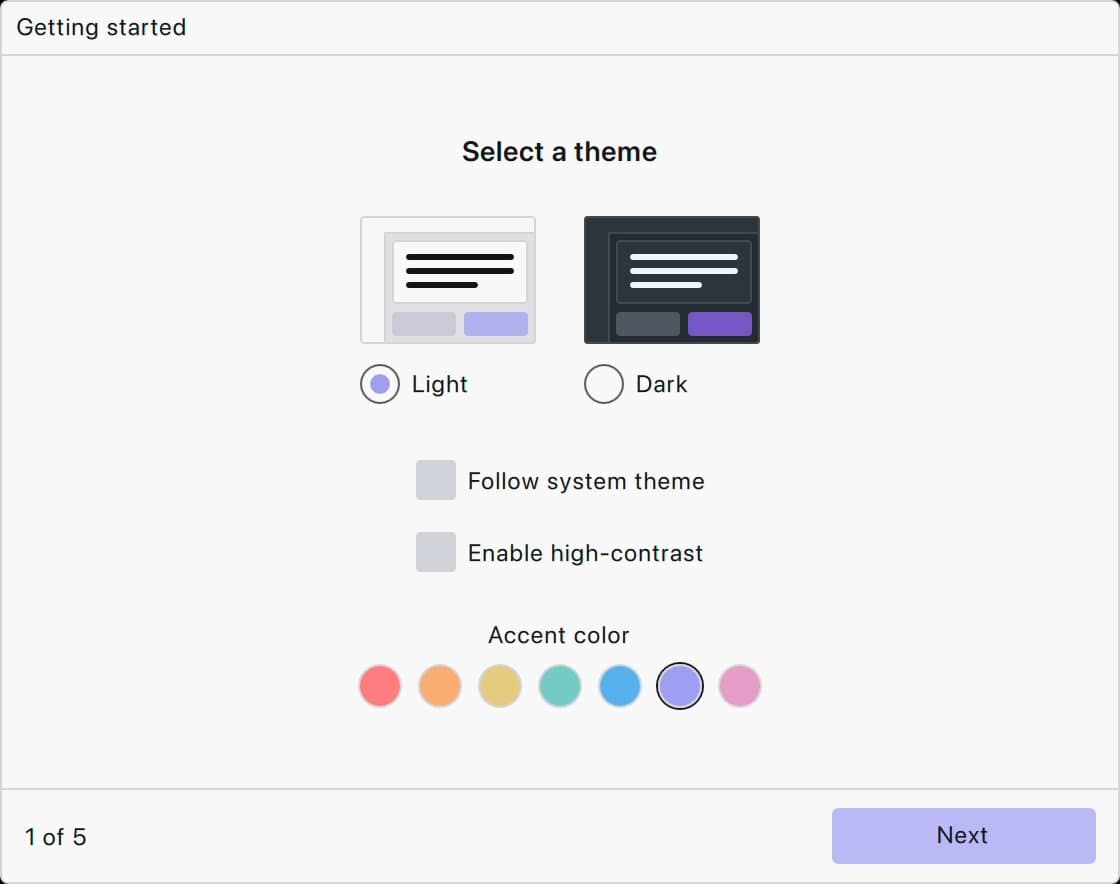
Page 1, Select a theme. Light or dark, an option to follow the system theme, a high-contrast switch, and an accent color.
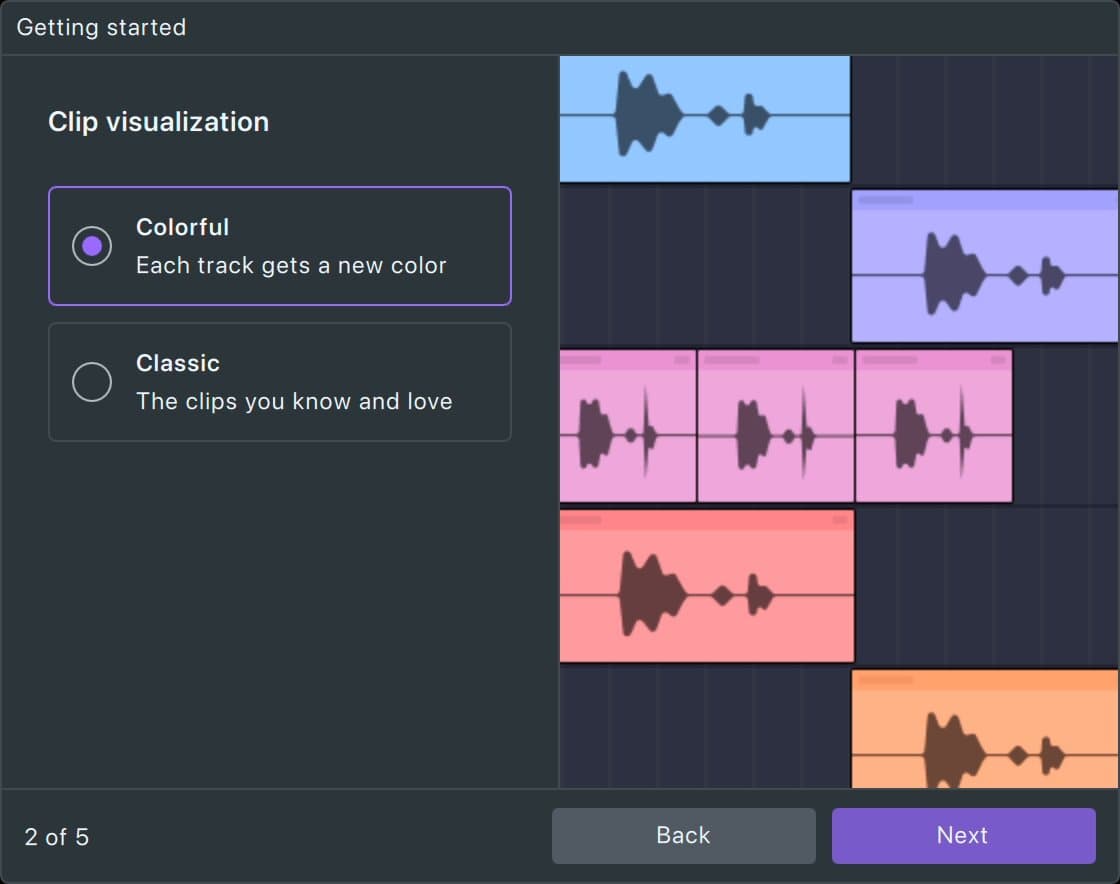
Page 2, Clip visualization. Colorful gives each track its own color; Classic draws the clips the way Audacity 3 did.
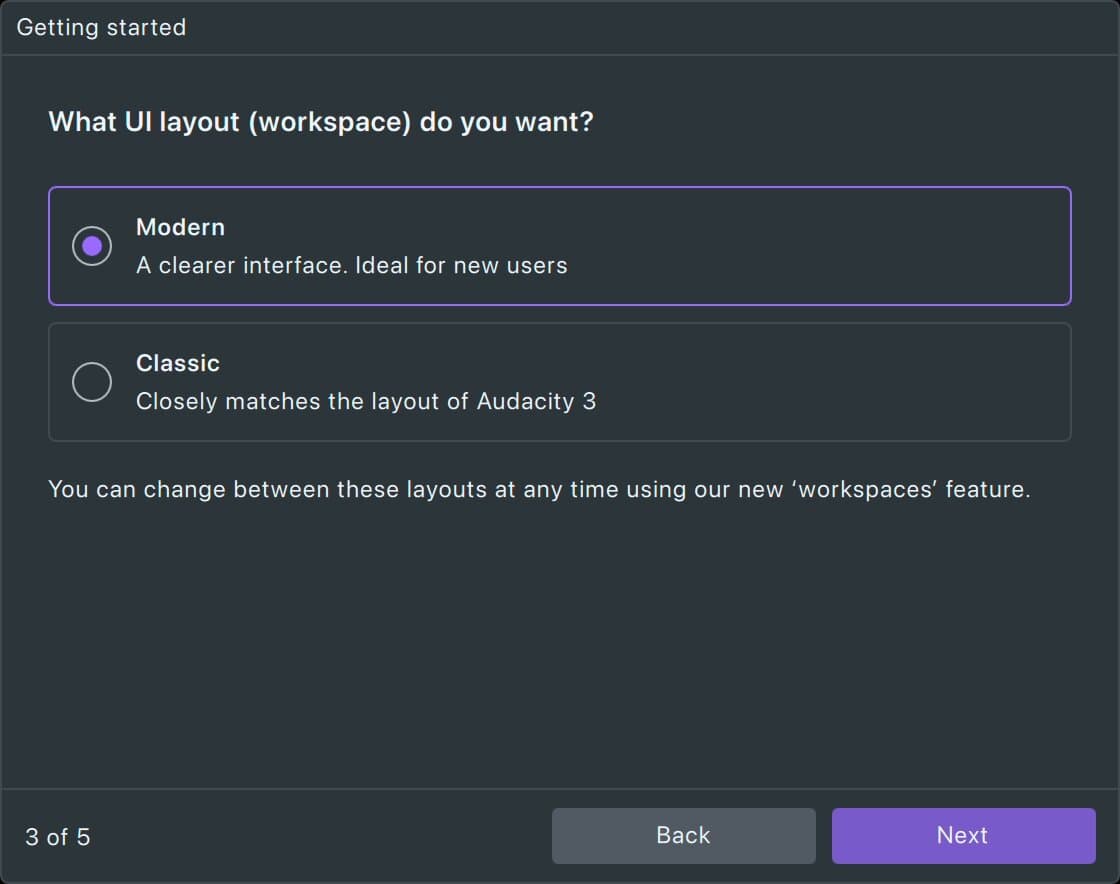
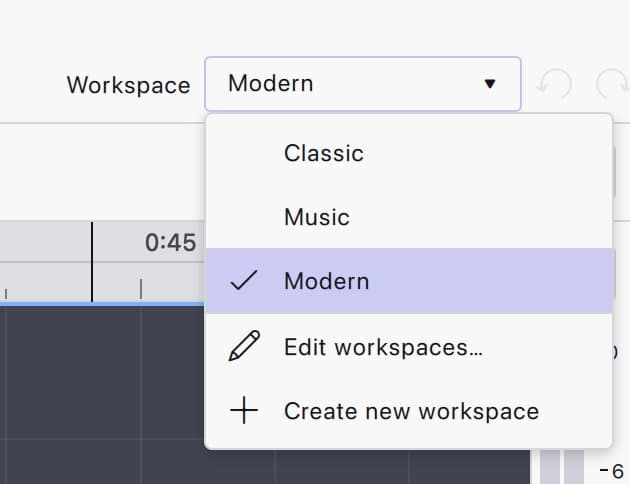
Page 3, the workspace. Modern is “a clearer interface, ideal for new users”; Classic “closely matches the layout of Audacity 3”. Pick Modern unless you already know Audacity 3 well. You can switch at any time with the workspace selector.
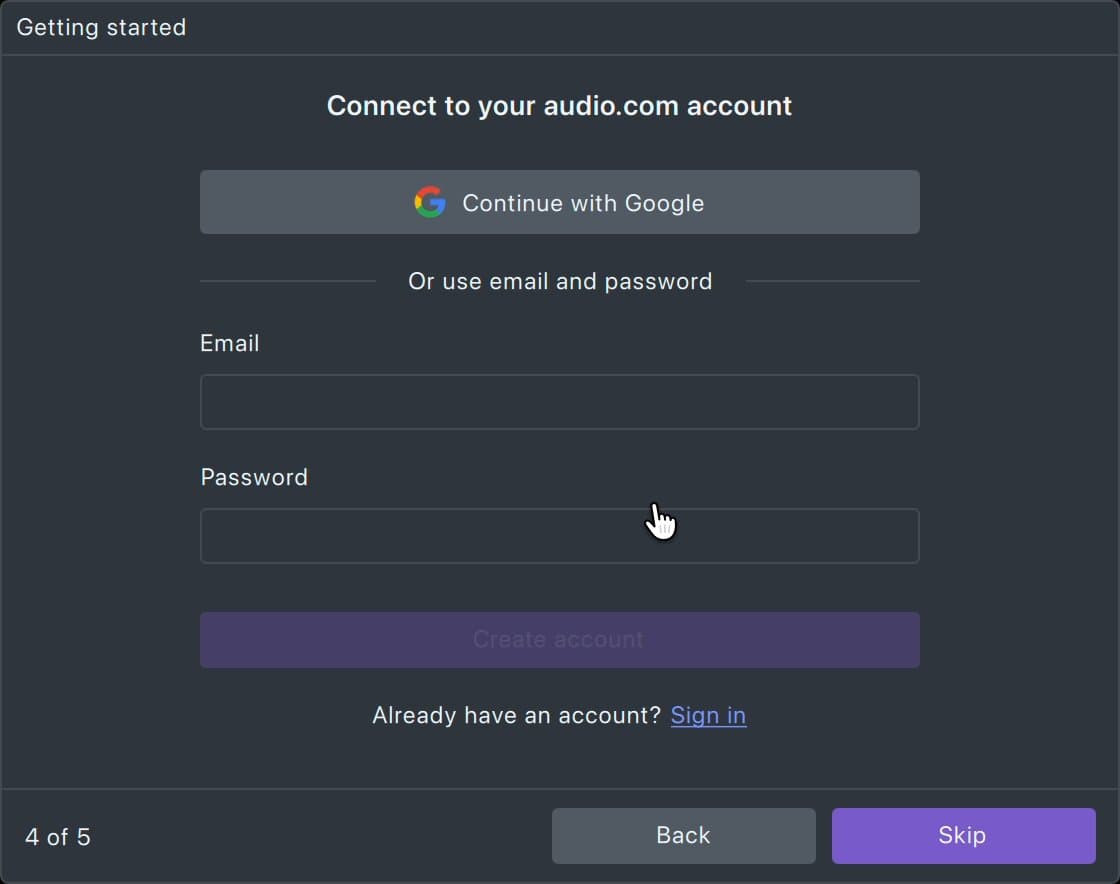
Page 4, audio.com. A sign-in to audio.com, the free service that stores Audacity projects in the cloud and shares exported audio by link. Continue with Google, or create an account with an email and password. You can skip it, and we recommend signing in: you meet it again at export time.
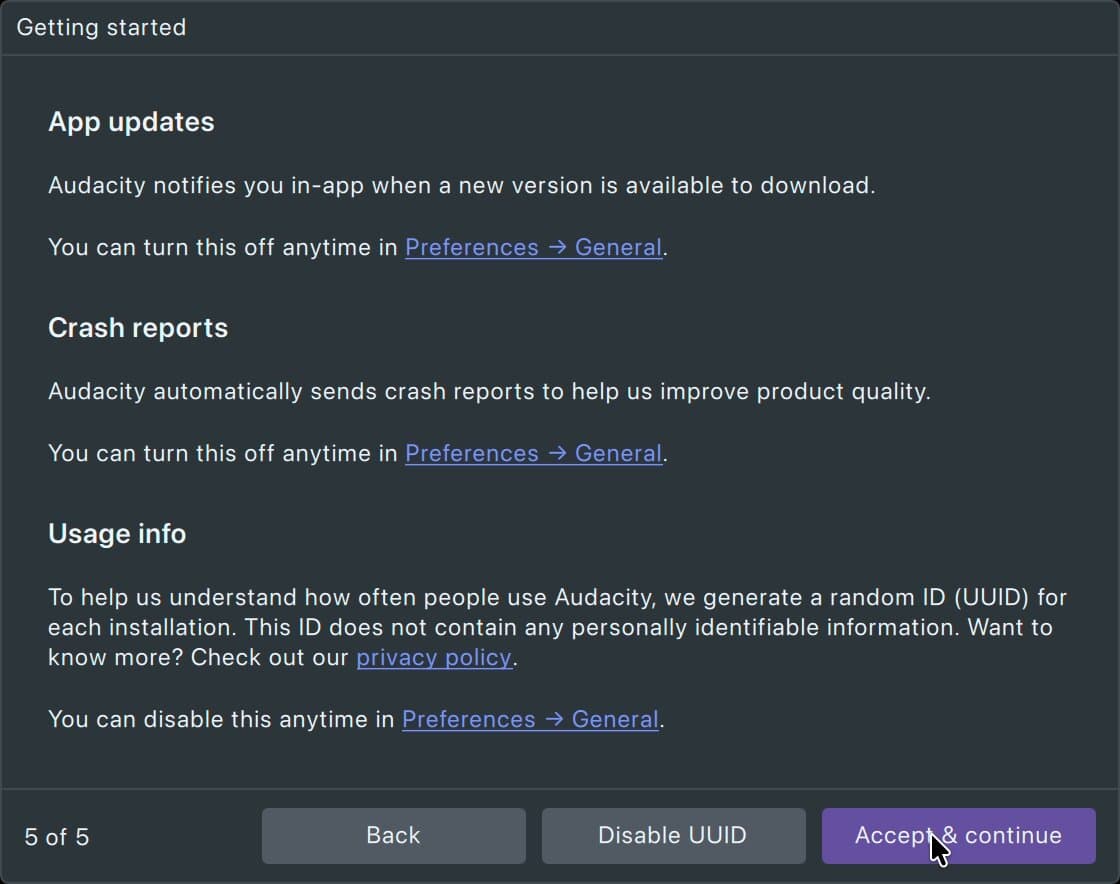
Page 5, app updates, crash reports and usage info. Audacity notifies you of new versions, sends crash reports and generates a random installation ID; each can be turned off in Preferences ▸ General. Accept & continue, or Disable UUID to opt out of the usage ID right here.
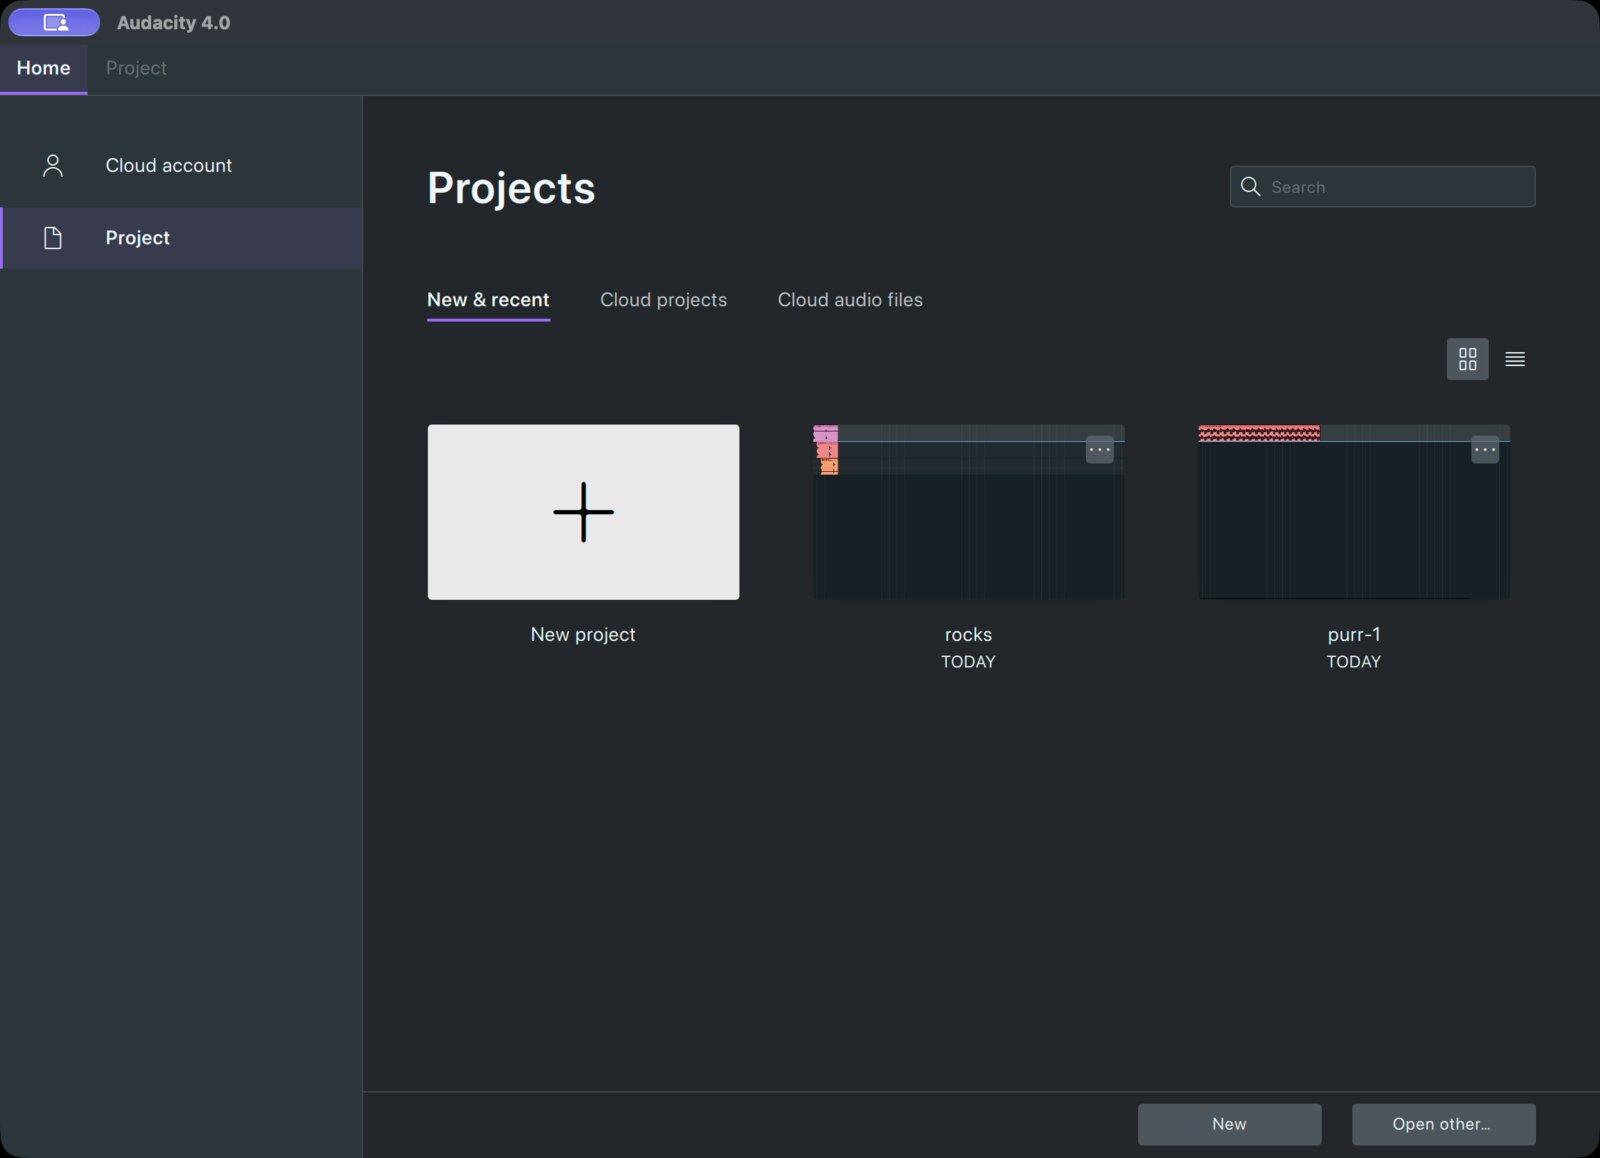
The home screen. Audacity opens on the Home tab, headed Projects, in New & recent. The first tile starts a new project; the rest are projects you opened before, newest first, with a search field and a switch between grid and list views. Two more tabs, Cloud projects and Cloud audio files, fill up once you sign in to audio.com. Click the New project tile, or New at the bottom right, to open an empty project.
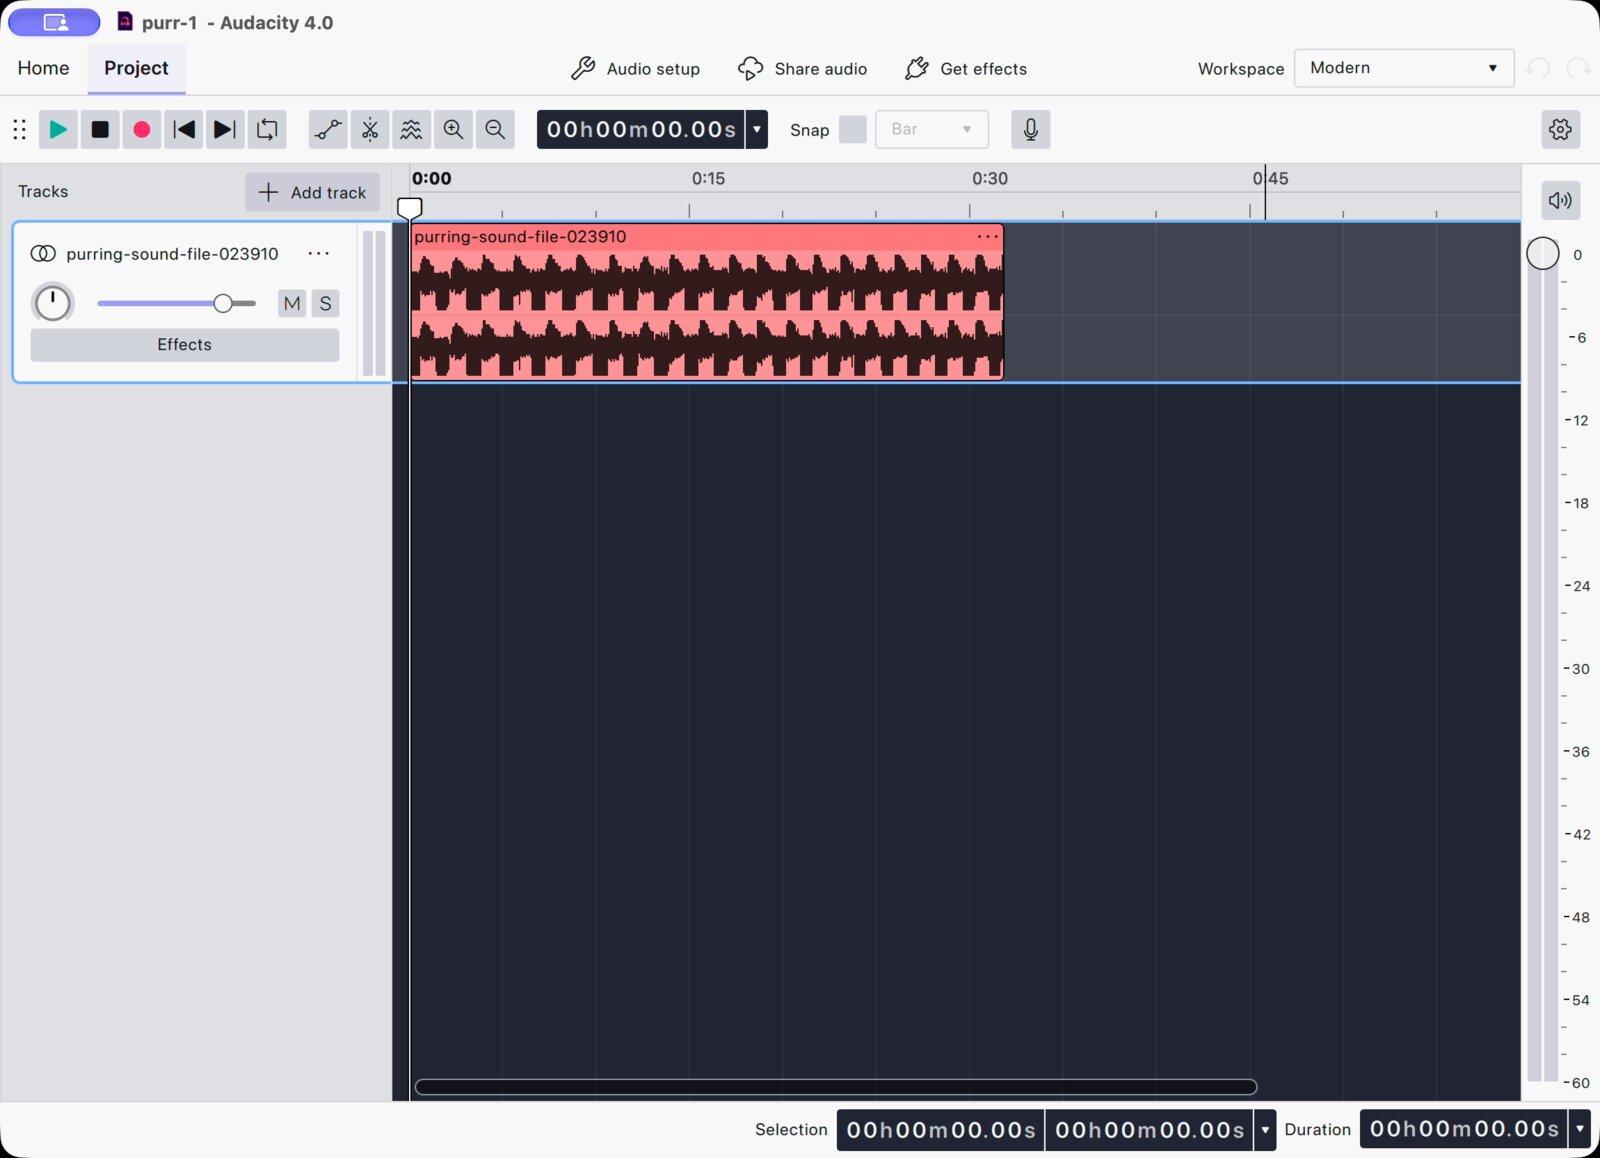
The window. The Project tab is where the work happens. From top to bottom:
- The top bar. Home and Project tabs on the left. In the middle sit three buttons: Audio setup (which microphone and speakers Audacity uses), Share audio (renders the project and uploads it to audio.com) and Get effects (opens the plugin catalog on MuseHub). On the right, the Workspace selector and the undo and redo arrows.
- The tools toolbar. Transport (play, stop, record, skip to start and end, loop), the Clip gain, Split tool and Toggle spectral view buttons, zoom, the playhead position as an editable time, Snap, and the microphone button that opens the input meter. The gear at the far right opens the toolbar settings.
- The tracks area. Each recording or imported file becomes a track. The panel on the left of a track holds its name, a knob and a slider for pan and volume, M (mute) and S (solo), a full-width Effects button, and a narrow level meter down its right edge. The wide area to the right is the timeline, with a ruler in minutes and seconds along the top and your audio drawn as clips.
- The playback meter. In the Modern workspace it stands on the right side of the window, with a scale in decibels; in Classic it sits in the toolbar. Selection and Duration read-outs run along the bottom.
Workspaces. A workspace is a named layout of the interface: which buttons the toolbar shows and how the ruler counts time. The Workspace selector at the top right lists Classic, Music and Modern, plus Edit workspaces… and Create new workspace. Modern (the default) keeps the toolbar short and moves the playback meter to the side. Classic puts Cut, Copy, Paste, Trim, Silence and the full zoom group in the toolbar, the way Audacity 3 did. Music rules the timeline in beats and measures and adds tempo and time-signature controls for material recorded to a click. Switching changes only the layout, never the project.
Step 3: Put a first sound on the timeline
You do not need a microphone to learn the window. Import a file and you have something to play, cut and process.
- Import a file. Drag an audio file onto the timeline, or use File ▸ Import (Ctrl+Shift+I, Cmd+Shift+I on a Mac). Audacity makes a track for it, named after the file, and draws the audio as one clip.
- Where to get a sound. audio.com’s sound-effects library is free and royalty-free, searchable by tag, and it belongs to Muse Group, the same company as Audacity and MuseHub. The sounds in the screenshots, a purring cat and a rock collision, came from there.
- Play it. Press Space to play from the playhead and Space again to stop. Click in the ruler to move the playhead.
Step 4: Your first recording
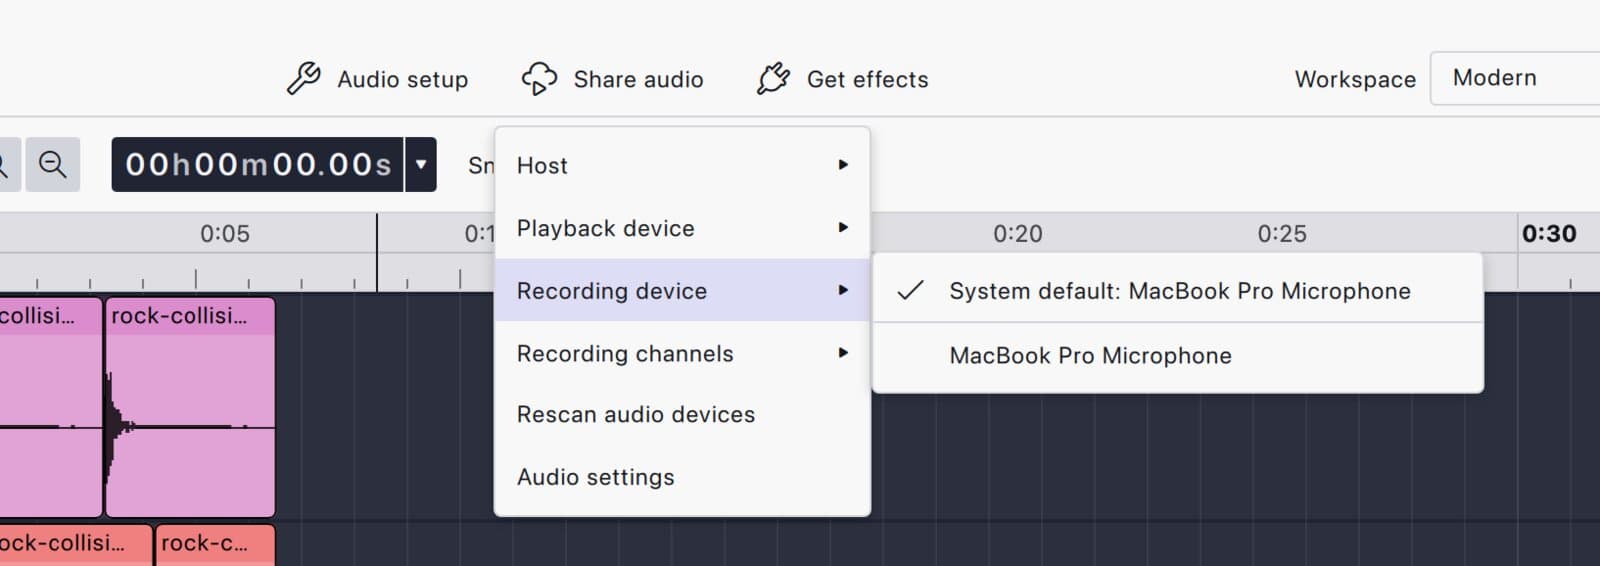
- Pick the devices. Click Audio setup in the top bar. The menu has Host, Playback device, Recording device, Recording channels, Rescan audio devices and Audio settings. Set Playback device to your headphones and Recording device to your microphone or interface, by name. On a laptop it starts as the system default, the built-in microphone.
- Missing a device? Click Rescan audio devices at the bottom of the menu.
- One microphone, one channel. Set Recording channels to mono. A stereo track from a single mic only doubles the file size.
- Set the level. Click the microphone button in the toolbar to open the input meter and speak at your normal volume. The manual’s target is peaks between −18 dB and −6 dB. If the meter reaches the top, the recording clips, and clipping cannot be undone afterward; turn the level down.
- Leave room at the start. Record five to ten seconds of silence first, so there is room to trim and a sample of the room for noise reduction later.
- Record. Press R or click the red Record button. Audacity records onto the selected track from the playhead.
- Layer over existing tracks. Use Record ▸ Record on new track to record onto a fresh track while the others play, which is how you put a voice over music.
- Stop and listen. Press Space to stop, and Space again to play it back.
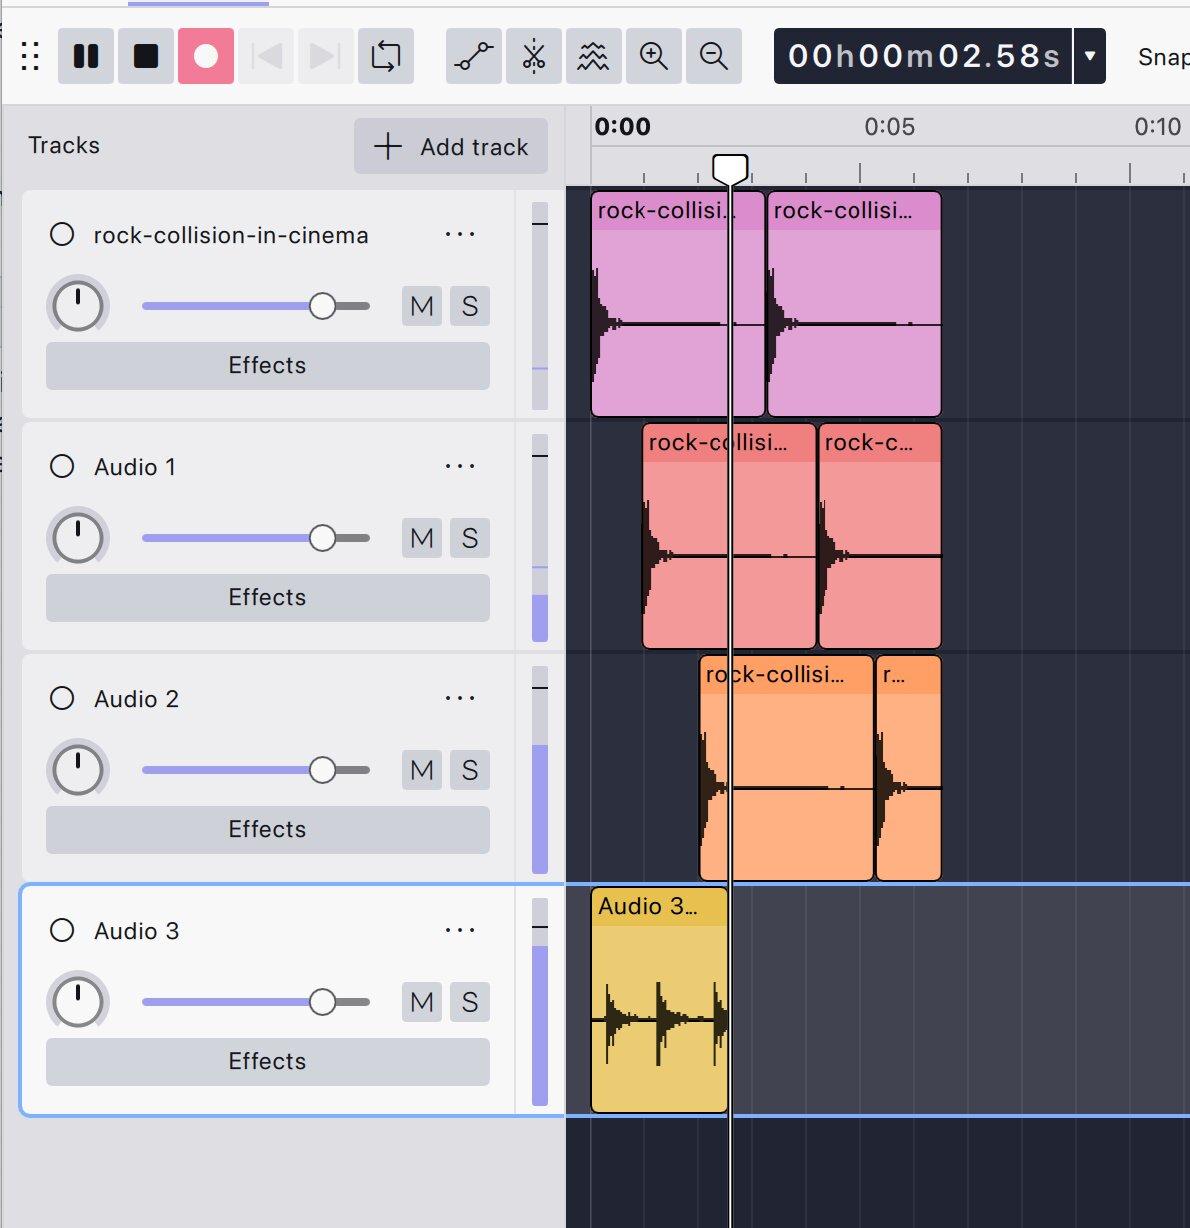
Then the recording itself. Here it lands on a fresh fourth track while three tracks of sound effects play back, which is what Record on new track does:
A solid block filling the track means the level was too high; a nearly flat line means it was too low. Either way, adjust and record again. Every recording lands as a new clip, so nothing you already have is overwritten. To start playing a couple of seconds before the point you record from, use Lead-in recording (Shift+D).
One special case has its own page: recording a turntable into Audacity, which also covers levels, click removal and splitting a side into tracks.
Step 5: Your first edits
Audacity 4 treats each block of audio as a clip you can pick up and reshape, which is the biggest change from earlier versions.
- Select a clip by clicking its header (the bar along its top). Handles appear at its edges: the outer ones trim the clip inward, and the ones marked with a clock stretch it, changing its speed. Trimmed audio is hidden rather than deleted, so you can drag the edge back out. Shift+click selects several clips.
- Move a clip by dragging its header along the track, or onto another track. Moving a clip onto another clip is allowed; the one underneath is eaten into where they overlap.
- Select a stretch of audio by clicking and dragging inside the waveform. Ctrl+A (Cmd+A on a Mac) selects everything.
- Delete the selection with the Delete key. The first time, Audacity asks whether to Leave gap or Close gap (ripple), which slides the later audio back to fill the hole. Ripple is what you want when cutting a mistake out of speech.
- Split with the split tool: press S, or click the scissors button, and click where the cut goes. Ctrl+I splits at the playhead.
- Trim clip (Ctrl+T) keeps the selection and removes the rest; Silence audio (Ctrl+L) mutes the selection without shortening anything.
- Undo with Ctrl+Z, as many times as you need. Ctrl+Shift+Z redoes.
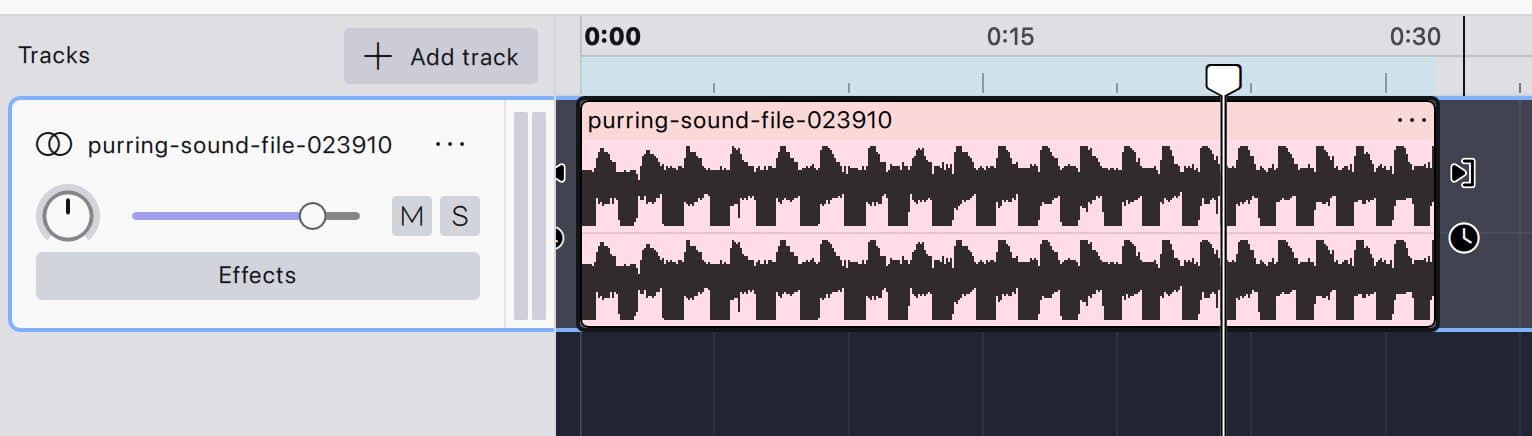
Zoom in with Ctrl+= and out with Ctrl+−, or hold Ctrl and scroll; Ctrl+F fits the whole project in the window. When you zoom in far enough to see individual samples, the draw tool switches on by itself.
The Audacity 4 manual’s editing pages list every cut with what it does to the timing.
Step 6: Your first effect
Audacity 4 has two kinds of effect. Realtime effects sit on a track and process the sound while it plays; you can change or remove them at any time and they are applied when you export. Destructive effects from the Effect menu change the waveform once, for jobs such as removing noise or normalizing a file.
Start with a realtime one:
- Select the track and press E, or click the Effects button in its panel. The Realtime effects panel opens on the left, headed with the track’s name and a power button.
- Click Add effect. Audacity’s own realtime effects sit under Audacity: Bass and Treble, Compressor, Limiter and Reverb. Choose Compressor. Its controls open at once.
- Press Space and listen. A compressor evens out the loud and quiet parts of a voice, which is why it is the usual first effect on speech.
- Click the effect’s power button to hear the track without it, then with it again. Effects in the stack run top to bottom.
Below the track’s effects is the Master section, with its own Add effect button. An effect there processes the whole mix; that is where a limiter goes when you are done.
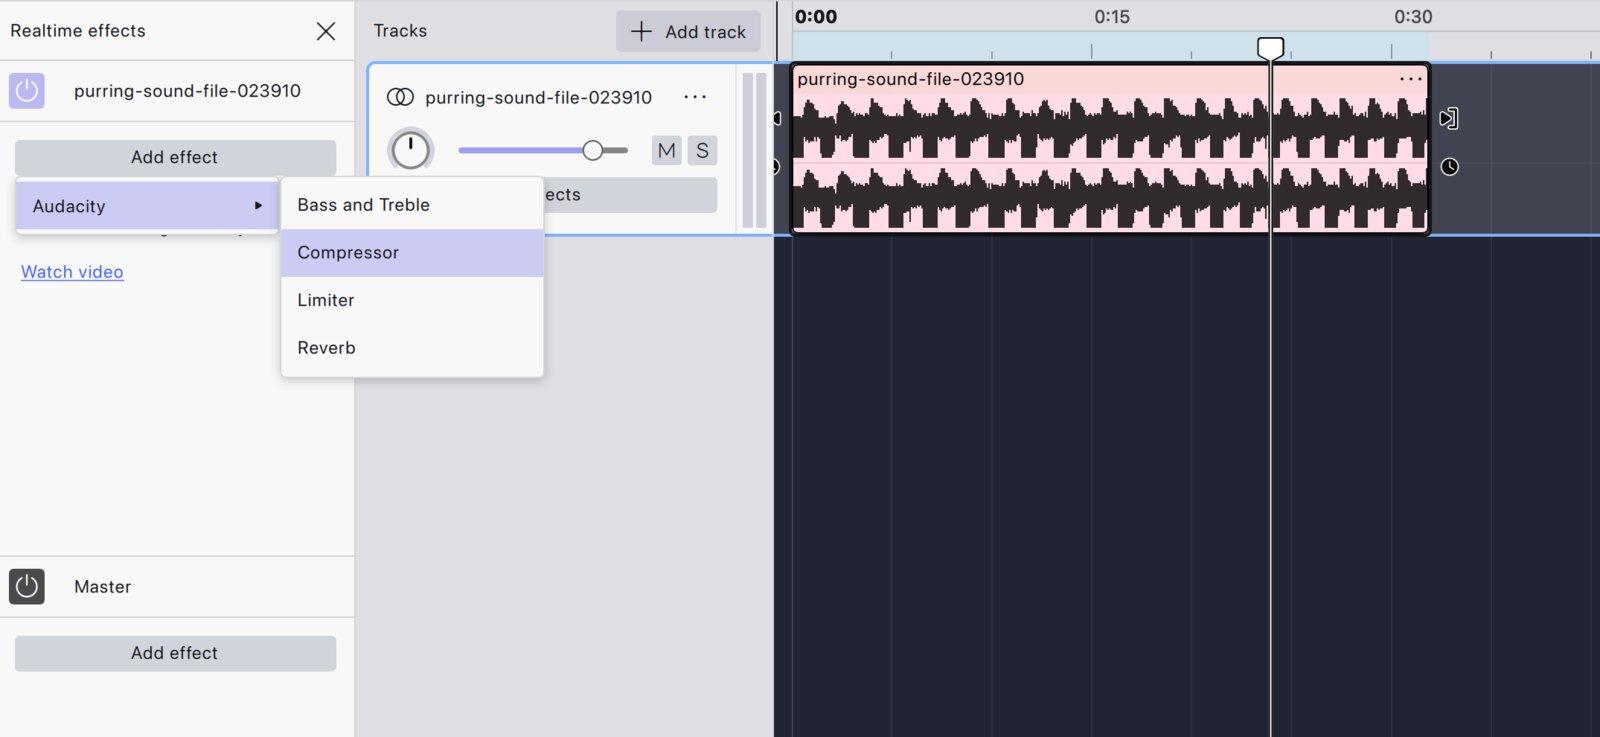
Plugins from MuseHub appear in the same Add effect list once Audacity has validated them on the next start; the Get effects button in the top bar takes you to the catalog. Installing them, the formats Audacity 4 loads, and the mistakes that make a plugin seem missing are in how to use effects and plugins in Audacity.
Step 7: Clean up and level
Two destructive effects fix most first recordings.
Noise reduction. Select the silence you recorded at the start, open Effect ▸ Noise removal and repair ▸ Noise reduction and click Get noise profile. Then select the whole track, open the same effect again and apply it. The settings, the noises it cannot fix, and the AI alternative are in noise reduction in Audacity.
Level. If the recording is quiet, select it and open Effect ▸ Volume and compression ▸ Normalize; the default brings the loudest peak to −1 dB. That raises the whole file evenly. To make speech sound consistently loud rather than merely peaking higher, you need compression or a limiter; how to use a compressor and what a limiter is explain which one for which job.
Step 8: Save the project, share it, or export the file
These are different actions, and mixing them up is the most common first-week mistake.
| Action | Where | What you get | Use it for |
|---|---|---|---|
| Save | File ▸ Save (Ctrl+S) | An .aup4 project file with the tracks, clips, edits and undo history. Only Audacity opens it. | Coming back to edit later. Audacity 4 also opens .aup3 projects from Audacity 3. |
| Save to cloud | File ▸ Save to cloud | The same project stored on audio.com, uploaded in the background. Needs a free audio.com account. | Backup, or working from another computer. |
| Share to audio.com | Share audio in the top bar, or the first export screen | An uncompressed upload with a shareable link; listeners can download it as WAV or MP3. | Sending a take to someone, hosting a finished piece. |
| Export | File ▸ Export audio (Ctrl+Shift+E) | One audio file on your computer: WAV, MP3, FLAC and other formats. | Sharing, uploading elsewhere, playing anywhere. |
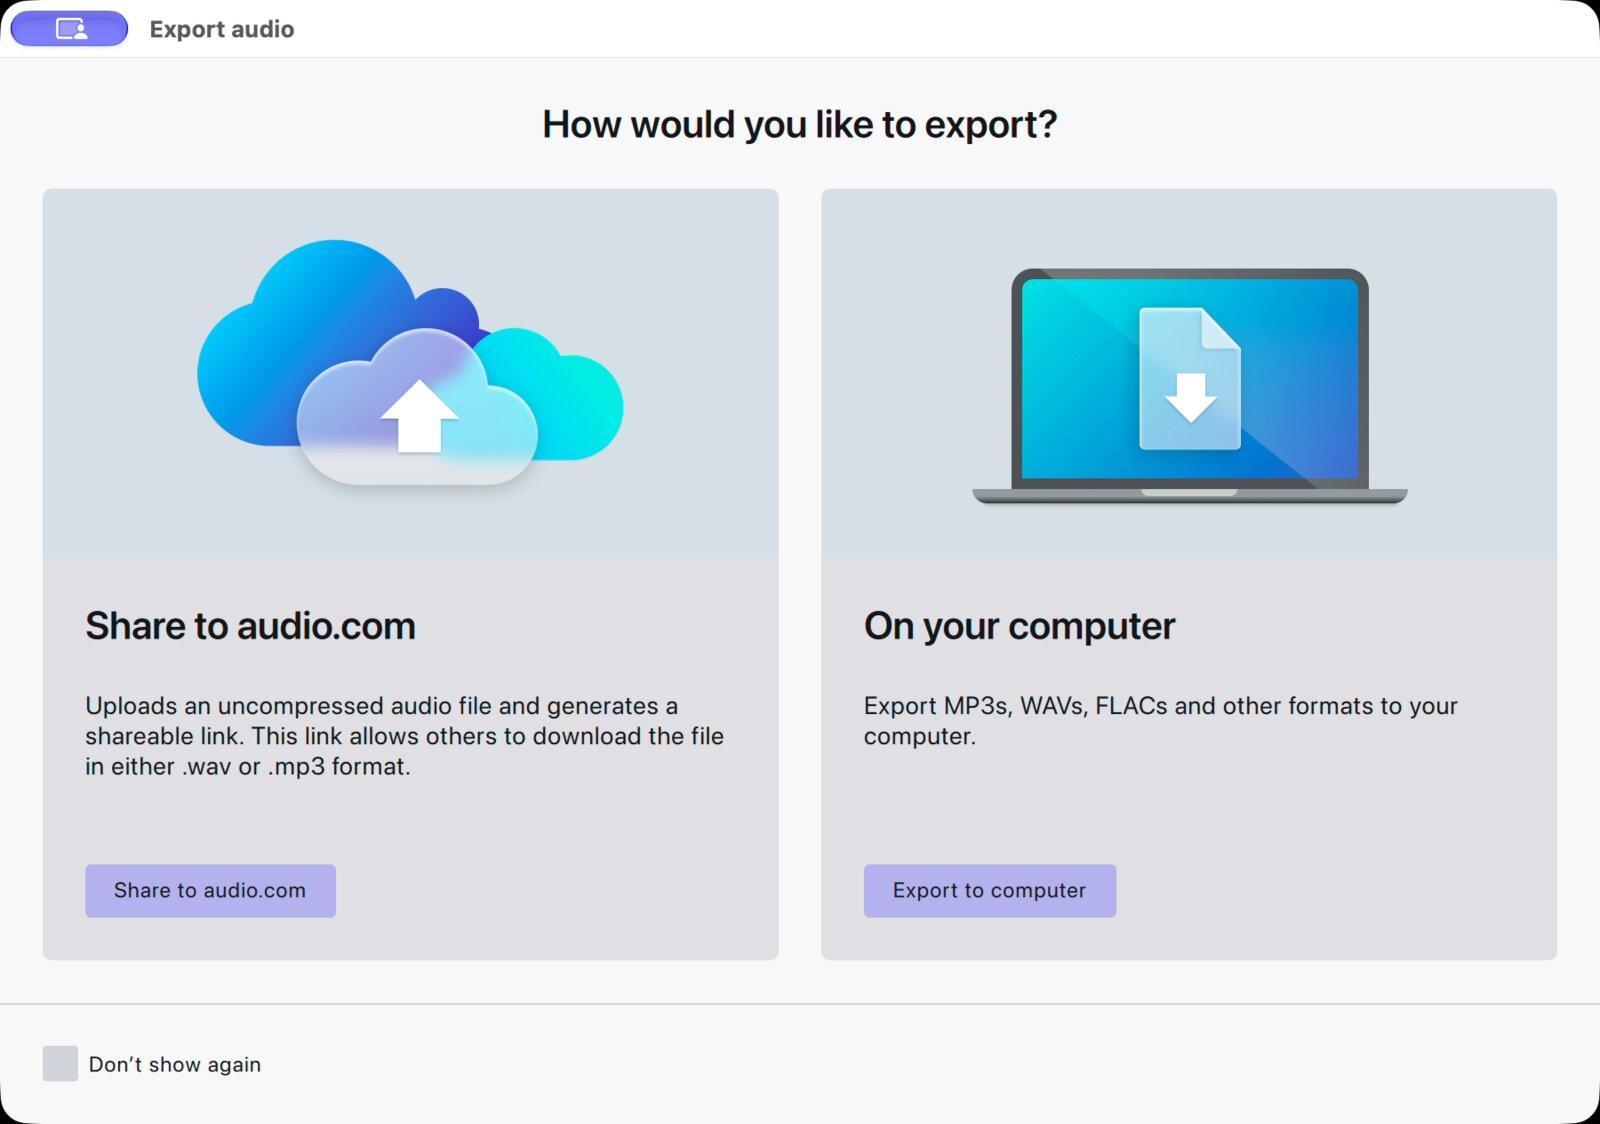
Export audio first asks How would you like to export? and offers two cards: Share to audio.com and On your computer. audio.com is Muse Group’s free hosting service for audio: it stores your projects, hosts your finished pieces and gives each one a link you can send or embed, so it is the natural first home for what you make in Audacity. Tick Don’t show again if you always export to disk.
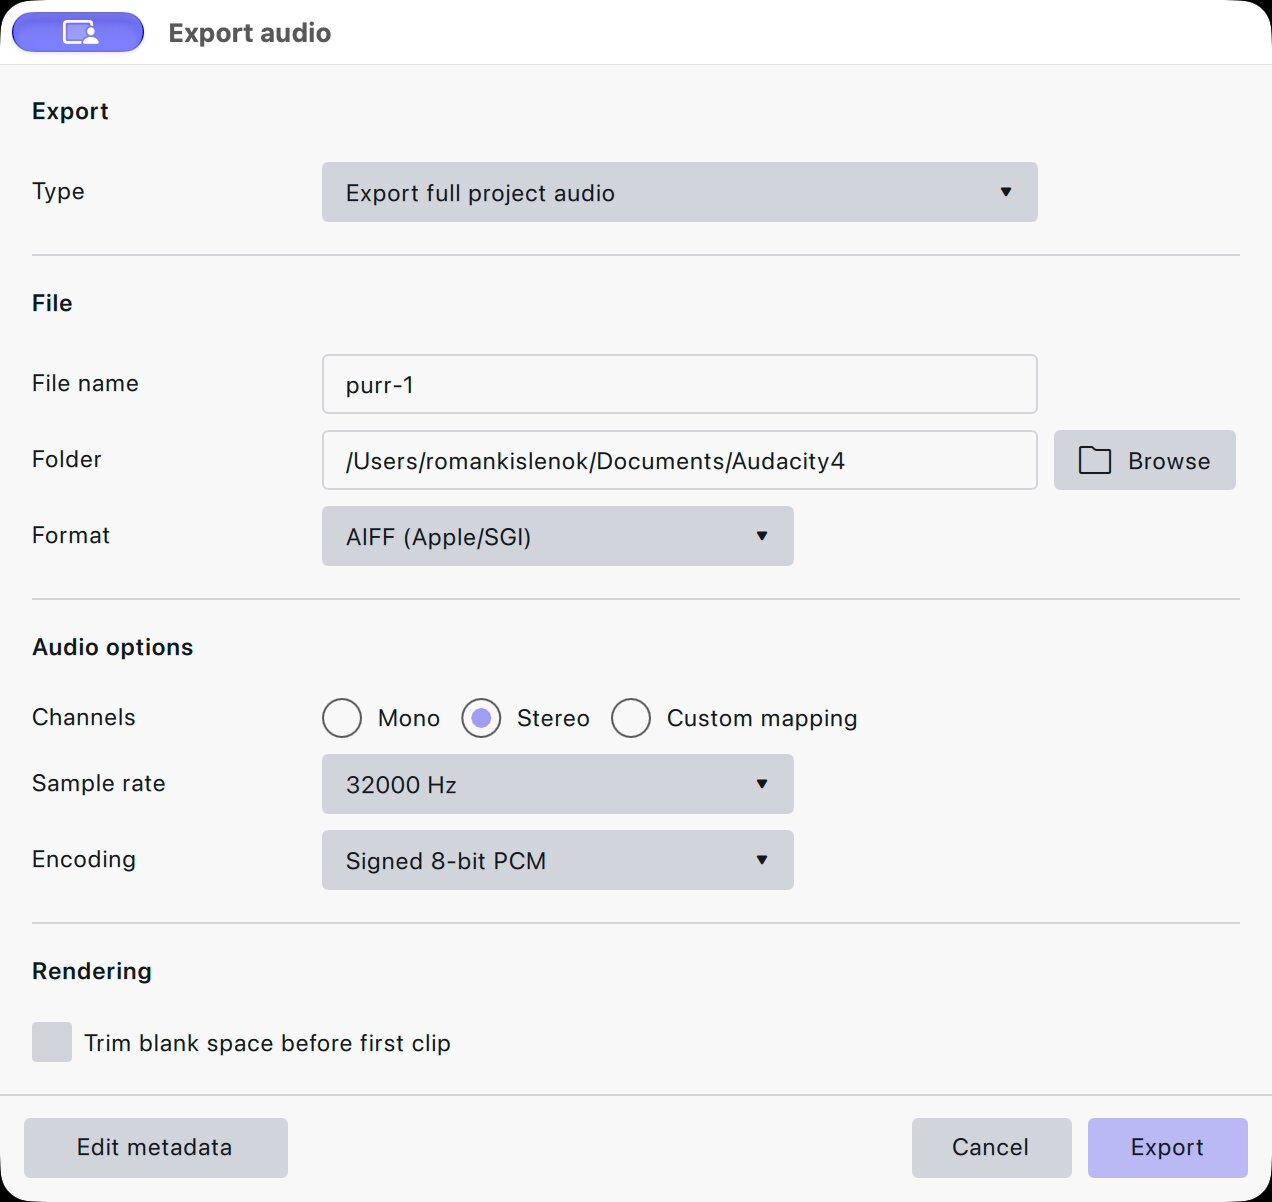
Choose Export to computer and the export dialog opens. Type offers the full project mixed to one file, only the selected audio, or the audio inside the loop region. Then set the File name, the Folder and the Format, and check Channels, Sample rate and Encoding under Audio options; the dialog remembers whatever was used last, so do not assume the defaults are sensible. Good choices: MP3 at 128 kbps for speech, 256 kbps for music, WAV when another program will process the file further, 44100 or 48000 Hz, and mono for a mono recording. Trim blank space before first clip removes the silence before the audio starts, and Edit metadata sets the title and artist. On the first export to a folder such as Documents, the operating system may ask permission; grant it or the export fails.
Save the project as well as exporting it, because the MP3 cannot be edited the way the project can.
Step 9: Where to go next, by job
The steps above are the same for every job. The specifics differ, and each has its own guide.
- A podcast episode. How to mix your podcast for better audio quality covers cleanup, leveling and loudness for speech, and podcast sound effects covers the music and effects around it.
- A record or a long recording. Recording a turntable into Audacity covers the capture, the cleanup and splitting a side into tracks.
- A vocal. The best autotune plugins ranks the pitch correctors that load in Audacity, and mixing vocals covers the chain after the take.
- Noise and AI cleanup. Noise reduction in Audacity and AI audio editing in Audacity cover the two cleanup jobs most recordings need; the AI tools currently run in Audacity 3.
- Better tools. Audacity’s built-in effects cover the basics and a few free plugins cover the rest; how to use effects and plugins in Audacity shows how they install, and the best free VST plugins lists the ones that cost nothing.
If you know Audacity 3
Audacity 4 changed the model more than the menus. The transition guide covers it in full; these are the changes you will meet in the first hour.
- Look and layout. Choosing the Classic clip theme and the Classic workspace during setup keeps “all the same tools and buttons”. The workspace also switches from the Workspace selector in the top bar, and both are in Preferences.
- Projects. Audacity 4 opens
.aup3files and saves as.aup4. Save and export work as before. - Clips are the unit. Click a clip to select it, Shift+click for several, drag the handles to trim or stretch. The Time Shift tool is gone because every clip drags by its header.
- Sync-Lock is gone; ripple editing replaced it. Deleting or inserting keeps tracks aligned by default, set in Preferences ▸ Audio editing. Delete and close gap (all tracks) is Ctrl+Delete, and Paste (preserves synchronization on all tracks) is Ctrl+Alt+Shift+V.
- No more tool modes. Volume envelopes are drawn with the Clip gain button in the toolbar. The Draw tool engages by itself once you zoom to samples. The Split tool is new; press S and click.
- Knobs instead of some sliders. Drag up or right to increase, down or left to decrease; double-click resets; Shift+drag for fine changes.
- Effects. The Effect menu still applies a one-off change to a selection. New are realtime effects per track and master effects on the mix, in the panel behind E. The plugin manager in the Effect menu is where plugins are enabled and rescanned.
- Plugin formats. Audacity 4 loads VST3 and Nyquist plugins everywhere, Audio Units on macOS and LV2 on Linux. VST2, LADSPA and Vamp plugins do not load in 4.0.0; Audacity 3, still on MuseHub, runs them, and the release notes say LADSPA and Vamp are planned to return.
- Export. One dialog, File ▸ Export audio, for the whole project, a selection or the loop region, after a first screen that offers audio.com. Labels export with File ▸ Export labels. Exporting one file per label is not in 4.0.0; Audacity 3 keeps that job for now.
Ten shortcuts a beginner needs
All verified against the Audacity 4 shortcut list. On a Mac, Cmd replaces Ctrl.
| What | Windows and Linux | macOS |
|---|---|---|
| Play or stop | Space | Space |
| Record on the current track | R | R |
| Open the realtime effects panel | E | E |
| Split tool | S | S |
| Undo / redo | Ctrl+Z / Ctrl+Shift+Z | Cmd+Z / Cmd+Shift+Z |
| Trim clip to the selection | Ctrl+T | Cmd+T |
| Silence the selection | Ctrl+L | Cmd+L |
| Zoom to fit the project | Ctrl+F | Cmd+F |
| Import a file | Ctrl+Shift+I | Cmd+Shift+I |
| Save / export audio | Ctrl+S / Ctrl+Shift+E | Cmd+S / Cmd+Shift+E |
Common mistakes
- Recording with speakers on. The microphone picks up the playback and the recording echoes. Use headphones.
- Recording too hot. A waveform that fills the track is clipped, and no effect repairs it. Aim for peaks between −18 and −6 dB and re-record.
- Skipping the silence at the start. Noise Reduction needs a sample of the room with nothing else in it. Five seconds before you speak gives it one.
- Exporting instead of saving, or the reverse. The MP3 is for listeners; the
.aup4is for you. Keep both. - Trusting the export dialog’s last settings. It reopens with whatever was used before, which on a fresh install can be an odd format or sample rate. Read Format, Sample rate and Encoding every time.
- Choosing “Leave gap” once and wondering why cuts leave holes. The first Delete sets a preference. Change it in Preferences ▸ Audio editing.
- Applying compression from the Effect menu. A mixing effect belongs in the realtime panel, where you can keep adjusting it. Save the Effect menu for one-off fixes.
- Installing a plugin and not seeing it. Audacity validates new plugins when it starts. Restart it and accept the validation, or open the plugin manager in the Effect menu and rescan.
Habits that help
- Record a ten-second test first and look at the waveform before the real take.
- Name your tracks (double-click the name in the track panel). Three tracks called “Audio 1”, “Audio 2” and “Audio 3” are three chances to edit the wrong one.
- Save early, then save often. The first Ctrl+S asks where the project lives; after that it is silent.
- Bypass to compare. The power button on every realtime effect is the honest way to hear whether it helped.
- Keep a sound library. A folder of effects and loops from audio.com and MuseHub saves a search every time you need a door, a whoosh or a bed of music.
- Install FFmpeg if you need M4A or WMA files. Patent rules keep it out of the installer; the manual’s FFmpeg page covers each OS.
FAQ
Get Audacity and its plugins in one place
MuseHub installs Audacity, keeps it updated, and puts the plugins next to it. For a first recording, the free ones are enough. MuseFX covers level, tone and a mastering chain; Graillon 3 adds pitch correction; Viator Voice Denoiser cleans a voice the built-in Noise Reduction cannot. The best free VST plugins lists more that cost nothing. Browse the plugins on MuseHub, or get Audacity and the plugins in one place — download MuseHub free.