How to add piano fingerings in MuseScore Studio
To add piano fingerings in MuseScore Studio, select a note, choose Add ▸ Text ▸ Fingering, type the finger number and press Space to move to the next note. Piano Fingering Studio, a plugin from Xylea Studio, can also generate the numbers for a passage or a whole score.
This guide covers both routes. You place fingering numbers with the Fingerings palette, the Add menu and the keyboard, and you edit them afterwards. Then you see how Piano Fingering Studio writes a first pass into the score for you to review and change.
Piano fingering for MuseScore Studio
What you’ll need
A fingering is the number above or below a note that tells the player which finger plays it, from 1 for the thumb to 5 for the little finger. MuseScore Studio stores each one as text attached to a note, so the notes have to be on the staff first.
- A piano score open in MuseScore Studio. The built-in tools need nothing else.
- MuseScore Studio 4.7.5 or a newer 4.x release, for Piano Fingering Studio only. The plugin is covered in its own section below.
Add piano fingerings with the Fingerings palette
The palette suits a few notes at a time, such as marking the one awkward bar of a piece.
- Add the palette. The
Fingeringspalette is not in the default palette list in MuseScore Studio 4. Click the + button in the palettes panel, chooseAdd palettesand pickFingerings. - Choose the notes. Select one note or several, then click a symbol in the palette. You can also drag a symbol onto a single note.
- Type the number. Focus moves to the new fingering, so you can type the finger number straight away.
For piano, use the plain Fingering symbol. It marks left-hand and right-hand fingering alike. The LH guitar fingering, RH guitar fingering and String number symbols are for fretted instruments, and some of them also sit in the Guitar palette.
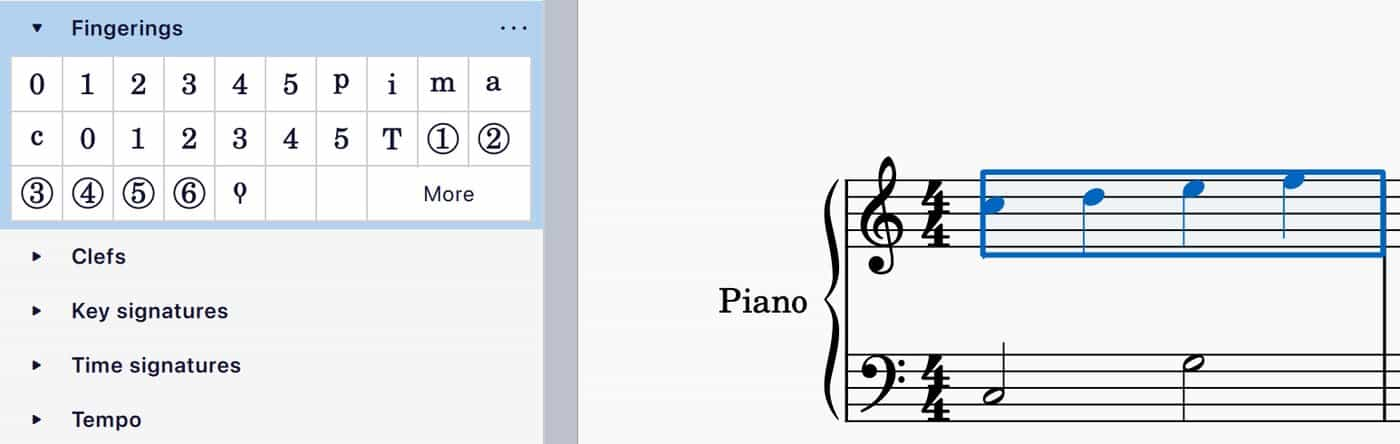
Here the Fingerings palette is open beside a bar with its notes selected.
Type fingerings for a whole passage
Typing is faster than the palette once a passage has more than a handful of notes, because you never leave the keyboard.
- Select the first note. Click the note where the passage starts.
- Start fingering entry. Choose
Add ▸ Text ▸ Fingering. - Type and move on. Type the number, press Space to jump to the next note and type its number. Shift+Space steps back one note. Alt+Right and Alt+Left also move forward and back.
- Finish. Press Esc when the passage ends.
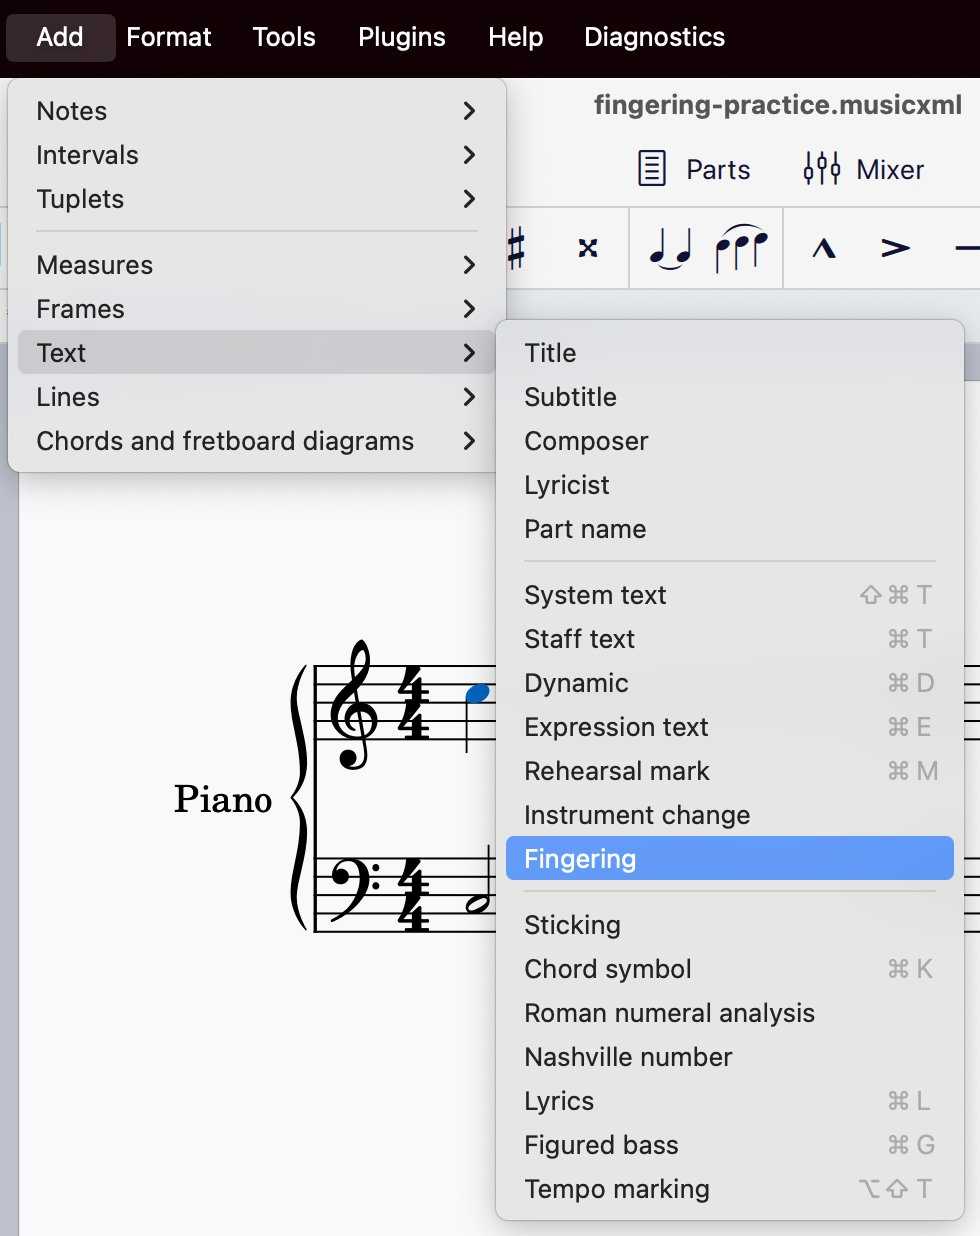
This is the menu path with one note selected.
Every number after the first uses the same fingering type as the first one, so begin with the plain Fingering type on a piano part.
The Fingering item in the Add menu has no default keyboard shortcut. If you add fingerings often, create an Add Fingering shortcut under Edit ▸ Preferences ▸ Shortcuts. On a Mac, Preferences sits in the app menu instead, so the path is MuseScore Studio ▸ Preferences ▸ Shortcuts. Select the first note, press the shortcut and type the numbers the same way.
Edit, move and flip fingerings
A fingering behaves like any other piece of text on the page, so changing one takes a few clicks.
- Move it. Move a fingering the way you move any other element on the page.
- Flip it. Press X or click
Flip directionin the note input toolbar. This works for some fingering types. - Restyle it. Use the
Textsection of the Properties panel for font, size and similar settings. - Change the default look. Open
Format ▸ Style ▸ Text stylesto set how every fingering in the score is drawn. - Remove it. Select the number and press Delete. On a Mac, either Delete key works.
Generate fingerings with Piano Fingering Studio

Piano Fingering Studio is a MuseScore Studio plugin that calculates fingerings and writes them into the score as ordinary, editable fingering numbers. It suits long pieces, or a score that arrives with no fingering at all, where typing every number would take an evening.
To use it you need a MuseHub account and a valid license, and installing it through MuseHub asks for administrator permissions. It runs on macOS 14 or later (Apple Silicon and Intel) and on Windows 10 or later (x64, with .NET Framework 4.8), alongside MuseScore Studio 4.7.5 or a compatible newer 4.x release. The plugin calculates on your computer, and MuseHub handles the license and updates.
- Open the score. Open a piano score in MuseScore Studio.
- Start the plugin. Choose
Plugins ▸ Piano Fingering Studio. - Pick what to finger. Generate fingerings for a selected passage or the whole score, for the left hand, the right hand or both.
- Set your reach and detail. Enter a comfortable hand reach, then choose a detail level. Essential marks only the places where a fingering choice matters. Guided, the default, adds reminders where your hand moves to a new position. Every note numbers each note the plugin can handle.
- Generate and review. Read the result in the score, where each number is a normal fingering you can edit.
The plugin aims for consistent fingerings in chords, repeated notes and patterns, and it takes sustained notes and hand movement into account. It also handles supported cross-staff passages, and it works on a piano part inside a score that has vocals or other instruments. Four-hand and six-hand scores are supported, with up to three pianists processed at once.
A hand reach is a limit, and some passages break it. Piano Fingering Studio lists warnings for passages that exceed your reach or need a second look, with links to the affected measures. Play those bars and change any number that does not fit your hand. Regenerating keeps the fingerings you entered or edited yourself, together with their styling, so a correction survives a second pass.
Copy fingerings to repeated passages
Smart Fingering Paste copies fingerings you have already reviewed to compatible passages in the same score, including supported ordinary ties. Select the source passage and click Copy Fingering. Then select the compatible destination in the same score and click Paste Fingering. Undo restores the previous state.
If your subscription ends
Your scores and the fingerings already in them stay editable. Generating new fingerings and using Smart Fingering Paste need a valid license.
Which method to use
| Method | Best when | What you need |
|---|---|---|
| Fingerings palette | You mark a few notes in one place | MuseScore Studio |
| Add menu or keyboard | You type the fingering of a whole passage in order | MuseScore Studio |
| Piano Fingering Studio | The score has no fingering, or a passage repeats | MuseHub account, license, MuseScore Studio 4.7.5 or newer |
Common mistakes
- Starting with a guitar symbol. Later numbers copy the type of the first one, so a guitar type on a piano part carries through the whole passage. Begin with plain
Fingering. - Retyping hand-marked fingerings before regenerating. Piano Fingering Studio keeps fingerings you entered or edited, so leave them in place.
- Accepting every generated number without playing it. The plugin flags the passages it wants you to review. Play those first.
FAQ
Next step
Open the piece you are learning, run Piano Fingering Studio on its hardest page and play through the bars it flags. A piano score usually needs chord symbols as well, and How to add chord symbols in MuseScore Studio covers them. Browse more tools for MuseScore Studio in the apps category.
Get Piano Fingering Studio and the rest in one place — download MuseHub free.